The Ultimate Guide to ComfyUI Subgraph and Blueprints

Hello creators, welcome back to A2SET’s AI Tutorial.
If you have used ComfyUI for image generation, you have probably seen a workflow that looks like a plate of node spaghetti.
At first, everything may look manageable. But as soon as you add more models, samplers, text encoders, VAEs, LoRA nodes, ControlNet nodes, or image processing nodes, the workspace can quickly become difficult to read.
The screen becomes crowded.
The connection lines overlap.
It becomes harder to understand which node does what.
This is where ComfyUI’s Subgraph and Blueprints can be useful.
A Subgraph lets you group a set of connected nodes and turn them into one cleaner node. A Blueprint lets you save a reusable Subgraph so you can bring it back later instead of rebuilding the same node group again.
In this tutorial, we will look at how to use Subgraph and Blueprints from a beginner-friendly perspective.
The goal is not to hide everything blindly. You still need to understand what is inside your workflow. However, if you use the same node bundle often, Subgraph and Blueprints can make your ComfyUI workspace cleaner and easier to manage.
Image caption: ComfyUI Subgraph and Blueprints can help turn complex node groups into cleaner reusable workflow components.
Part 1: Clean Up Your Workspace with Subgraph
A Subgraph is useful when you have a group of nodes that work together and you do not want to see every single connection all the time.
For example, in an image generation workflow, you may have nodes such as Load Diffusion Model, CLIP Text Encode, KSampler, VAE Decode, and other supporting nodes connected together.
When these nodes are spread across the screen, the workflow can look complicated even if the logic is simple.
A Subgraph lets you compress that connected group into one larger node.
Think of it like putting several related tools into one folder.
The tools are still there, but your workspace becomes easier to read.
Step 1: Select the Nodes You Want to Group
First, open the part of the workflow you want to clean up.
For example, you might select the core generation section of a Z-Image-Turbo workflow or another image generation workflow that contains many connected nodes.
Drag your mouse over the nodes you want to group.
Make sure you select only the nodes that belong together.
If you accidentally include unrelated nodes, the Subgraph may become harder to reuse later.
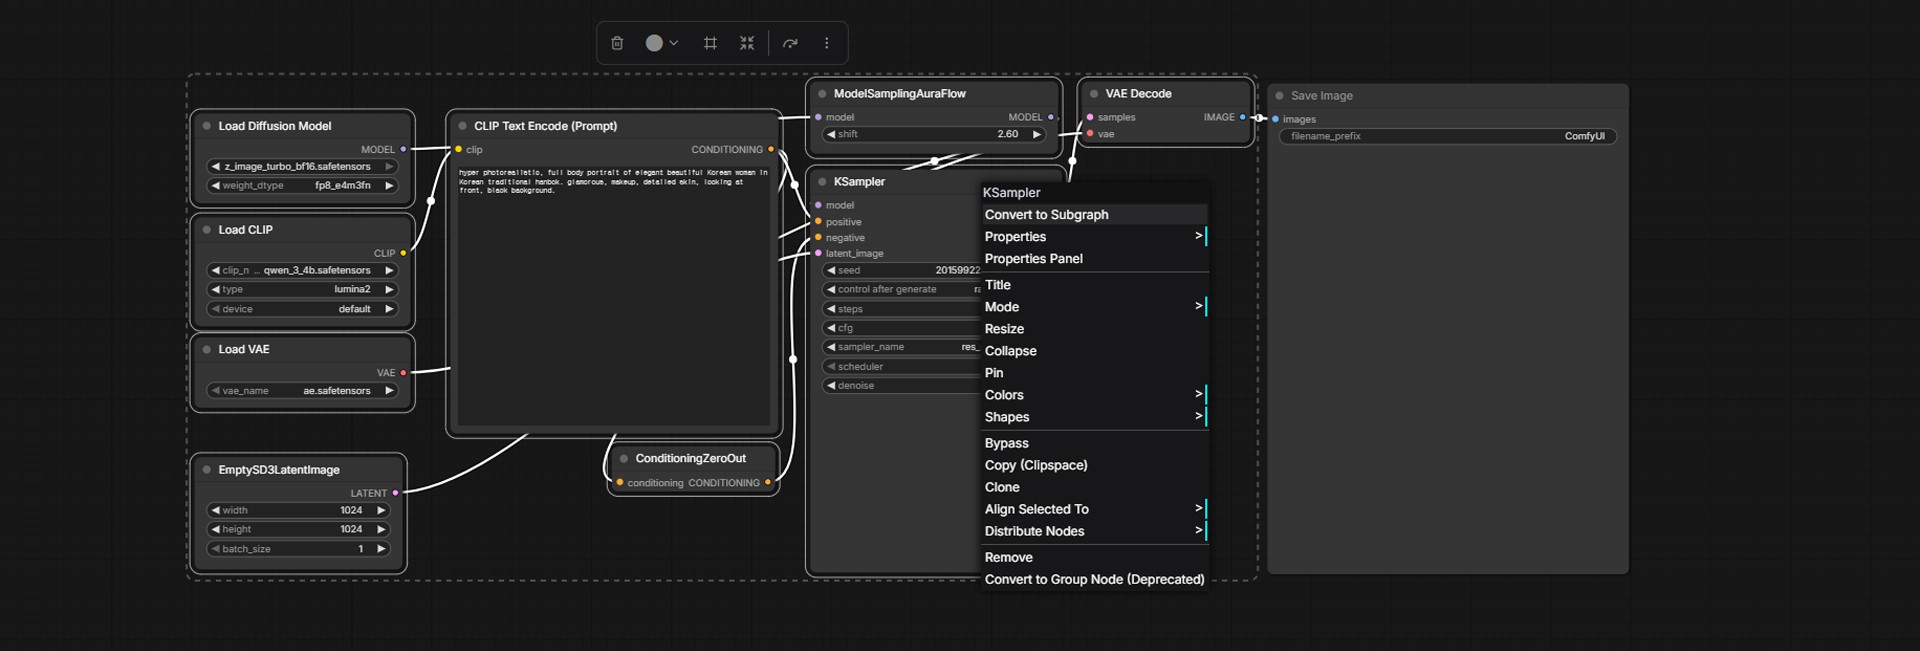
Image caption: Select only the related nodes that should work together as one reusable group.
Step 2: Create the Subgraph
After selecting the nodes, right-click on the selected area.
From the menu, choose Create Subgraph.
ComfyUI will turn the selected node group into one Subgraph node.
The original nodes are now contained inside the Subgraph, and the workspace becomes much cleaner.
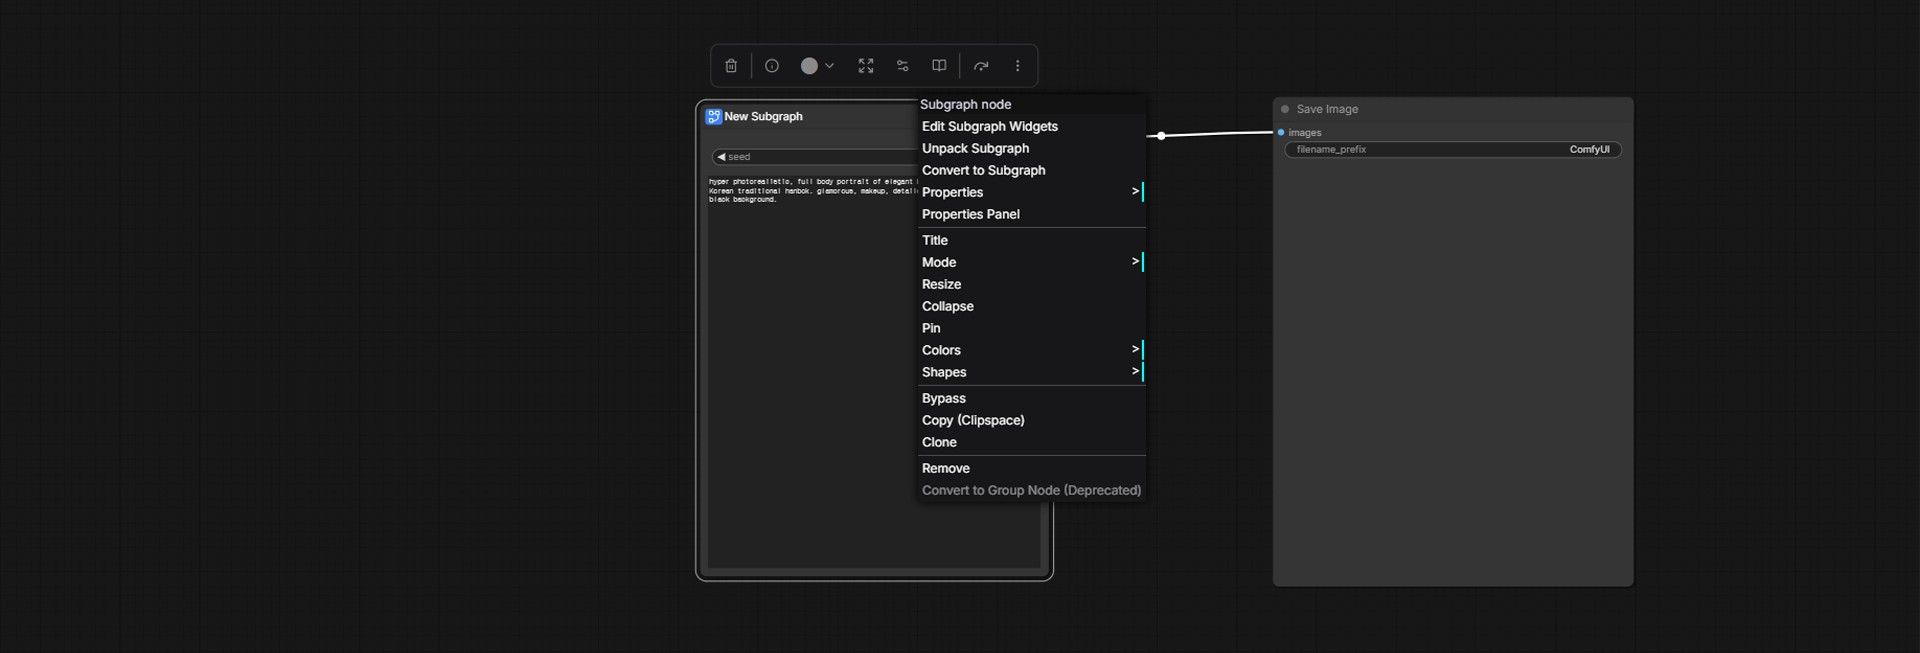
Image caption: Use Create Subgraph to compress the selected node group into one cleaner node.
This is especially useful when you want to keep the main workflow readable.
Instead of seeing every small internal connection, you can focus on the larger structure of the workflow.
For example, one Subgraph can represent the image generation core.
Another Subgraph can represent an upscaling process.
Another Subgraph can represent a reusable pre-processing section.
This makes the entire workflow easier to understand at a glance.
Step 3: Unpack the Subgraph When You Need to Edit It
Sometimes, you may want to change the settings inside a Subgraph.
For example, you might want to adjust a sampler setting, change a model-related node, reconnect something, or check the original internal structure.
In that case, right-click the Subgraph node and choose Unpack Subgraph.
ComfyUI will expand the Subgraph back into the original nodes.
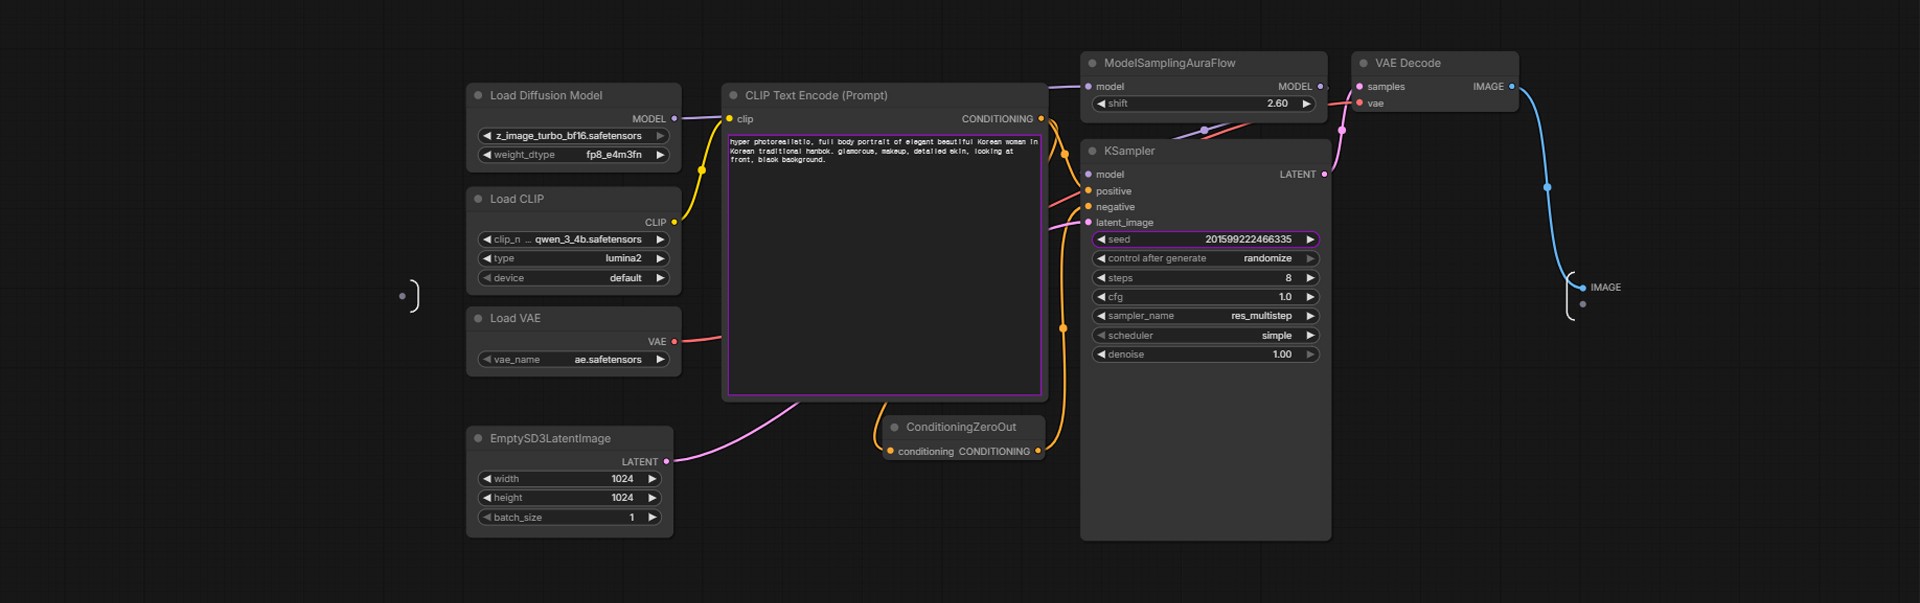
Image caption: Use Unpack Subgraph when you need to edit or inspect the nodes inside the compressed group.
This is why Subgraph is useful for workflow organization.
It does not permanently destroy the original node structure. It simply helps you package and manage the nodes more cleanly.
You can create a Subgraph, test it, unpack it, adjust it, and create it again.
Part 2: Save Reusable Node Groups with Blueprints
A Subgraph is useful inside one workflow.
But what if you want to use the same Subgraph in another workflow later?
This is where Blueprints become useful.
A Blueprint lets you save a reusable Subgraph as a file, so you can bring it back when you start a new workflow.
For creators who often use the same node combinations, this can save time.
For example, you might create Blueprints for a basic text-to-image setup, a specific upscaling pipeline, a ControlNet setup, a LoRA loading group, or a reusable image processing chain.
Step 4: Export the Subgraph as JSON
After creating a Subgraph, right-click the Subgraph node.
Choose the export option and save it as a JSON file.
You can name it something easy to understand, such as:
my_z_image_turbo.json
or
basic_upscale_chain.json
or
controlnet_canny_setup.json
Use a clear file name because you may collect many Blueprint files over time.
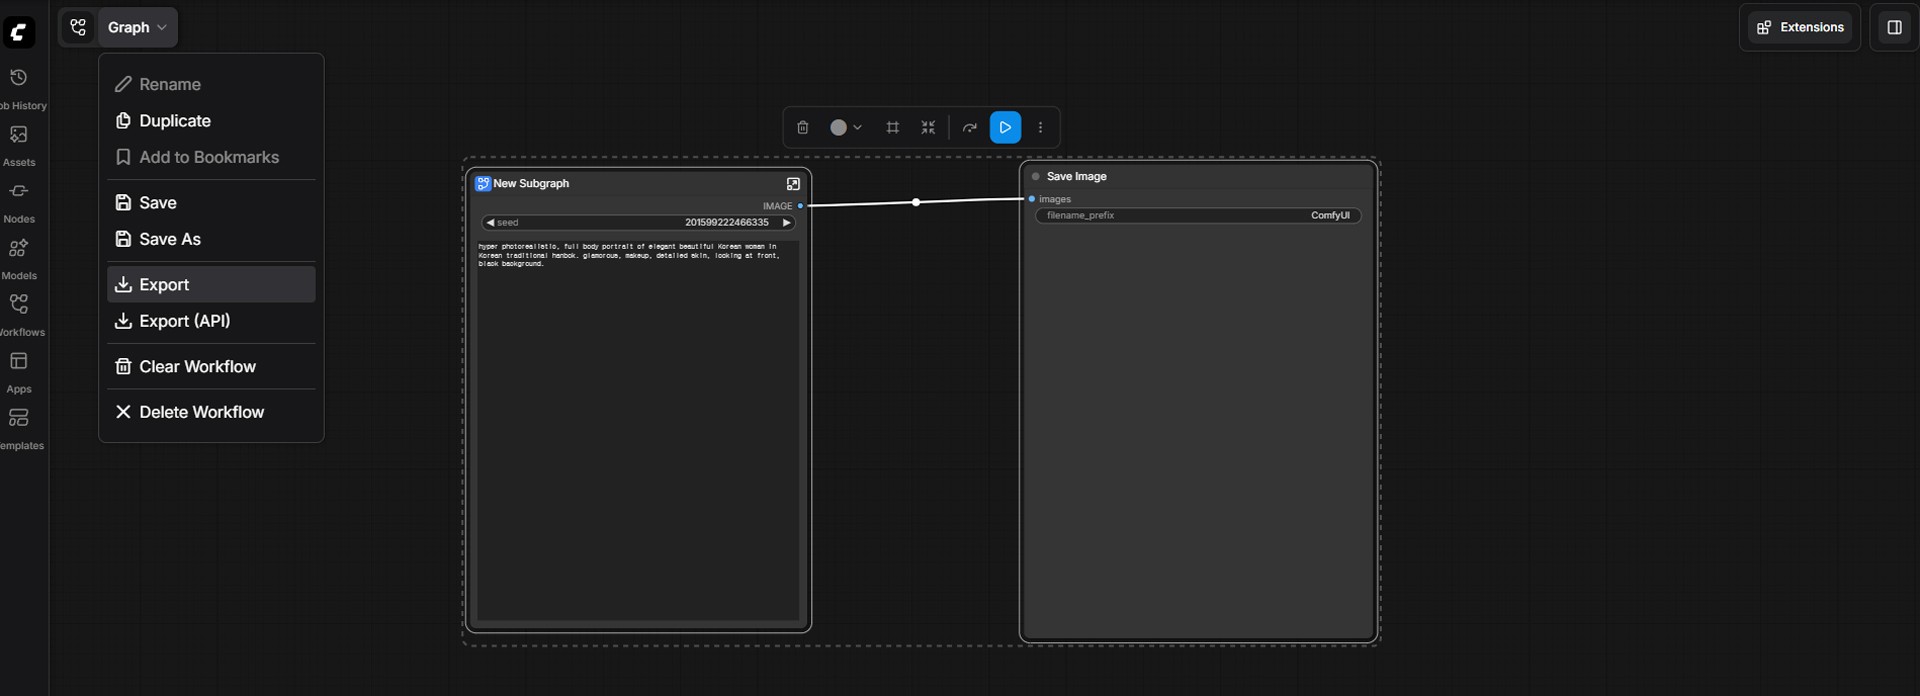
Image caption: Export the Subgraph as a JSON file so it can be saved and reused later.
Step 5: Place the JSON File in the Blueprint Folder
After exporting the JSON file, move it into the Blueprint-related folder used by your ComfyUI installation.
In the original workflow, the JSON file is placed inside the blueprints folder that already exists in the ComfyUI directory.
Depending on your ComfyUI version or setup, folder naming and location can vary. If your installation already shows a blueprints folder like the example screenshot, use that folder. If you are packaging Subgraph Blueprints for a custom node workflow, ComfyUI’s official developer documentation describes using a subgraphs folder inside the custom node directory.
For a beginner using the same local workflow as this tutorial, follow the folder shown in your ComfyUI installation and keep the exported JSON file there.
This step is what makes the Subgraph reusable outside the current workflow.
Instead of rebuilding the same node group from scratch, you can load it again later as a reusable component.
Step 6: Restart ComfyUI and Search for the Blueprint
After placing the JSON file in the correct folder, completely close and restart ComfyUI.
This is important because ComfyUI may need to scan the folder again before the new Blueprint appears.
After restarting, double-click an empty area of the ComfyUI canvas or open the node search menu.
Search for the name of your saved Blueprint.
If everything is set correctly, your saved Subgraph should appear in the search list and can be added to the canvas like a normal reusable node group.
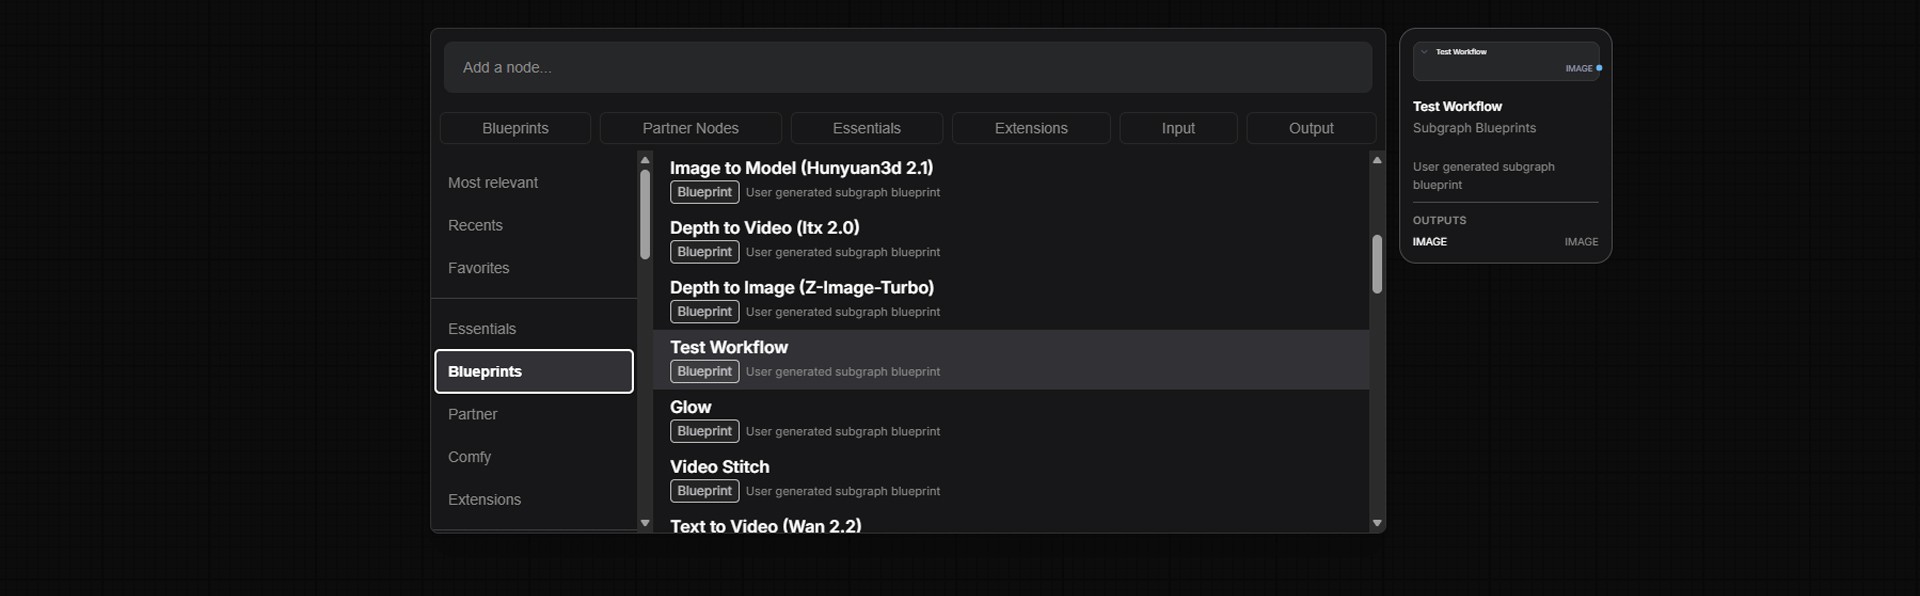
Image caption: After restarting ComfyUI, search for the saved Blueprint and add it back into the workflow when needed.
Now you can reuse the node bundle without manually rebuilding every connection.
This is especially helpful when you work with repeated workflows.
When Should You Use Subgraph?
Subgraph is useful when a group of nodes has a clear purpose.
For example, use Subgraph for a generation core, an upscaling section, a reusable pre-processing group, a style transfer block, or a ControlNet setup.
It is less useful when the nodes are unrelated or still changing too often.
If you group everything too early, it may become harder to debug.
A good rule is simple.
First, build and test the workflow normally.
Then, once a section works well and you use it repeatedly, turn it into a Subgraph.
When Should You Use Blueprints?
Blueprints are useful when you want to save a working Subgraph and reuse it in future projects.
For example, if you always use the same model loading setup, the same upscaling chain, or the same image processing sequence, saving it as a Blueprint can make future workflow building faster.
Instead of copying nodes from an old workflow, you can load the saved Blueprint directly.
This makes ComfyUI feel more modular.
Common Issues and Simple Fixes
If the Subgraph does not work correctly, unpack it and check whether all required nodes were included.
If some connections are missing, create the Subgraph again after selecting the full related node group.
If the Blueprint does not appear after saving, restart ComfyUI and check whether the JSON file was placed in the correct folder.
If the Blueprint name is hard to find, rename the JSON file clearly before saving it.
If a workflow becomes harder to debug, unpack the Subgraph and inspect the internal node connections.
Why This Workflow Is Useful
Subgraph and Blueprints are useful because they make ComfyUI easier to manage.
ComfyUI is powerful because it is node-based, but that same flexibility can make large workflows visually overwhelming.
By grouping related nodes, you can keep the canvas cleaner.
By saving those groups as Blueprints, you can reuse your best setups in future workflows.
This can be helpful for creators who often build image generation pipelines, upscaling workflows, video workflows, ControlNet setups, LoRA experiments, or model testing chains.
It does not replace understanding the nodes.
But it does help organize the workflow so you can focus on the creative direction instead of constantly managing visual clutter.
Responsible Use Notes
When saving and sharing ComfyUI workflows, make sure you understand what is included inside the Subgraph or Blueprint.
A Blueprint may depend on custom nodes, model files, LoRA files, or settings that another user does not have installed.
If you share a Blueprint with someone else, explain what models, custom nodes, and dependencies are required.
Also be careful not to include private file paths, personal project names, or internal workflow details if the file will be shared publicly.
For professional use, keep your Blueprints organized by purpose and version.
Conclusion
In this tutorial, we looked at how to use ComfyUI Subgraph and Blueprints to make complex node workflows easier to manage.
A Subgraph helps compress a group of related nodes into one cleaner node.
Unpack Subgraph lets you open the group again when you need to edit it.
Exporting the Subgraph as JSON lets you save the node group.
Blueprints let you reuse that saved node group later in other workflows.
This workflow is useful because it turns repeated node setups into modular building blocks.
Start by grouping only the nodes that clearly belong together.
Test the Subgraph before saving it.
Export it with a clear name.
Place it in the correct Blueprint-related folder.
Restart ComfyUI.
Then load it again when you need it.
That is how ComfyUI becomes less cluttered and more reusable for real creative workflows.
We will return in the next A2SET tutorial with more practical AI workflows for creators, designers, and small production teams.
Quick FAQ
What is a Subgraph in ComfyUI?
A Subgraph is a reusable group of connected nodes that can be packaged into one cleaner node inside the workflow.
Does Subgraph delete the original nodes?
No. It groups the selected nodes. If you need to edit the internal structure, you can unpack the Subgraph again.
What is a Blueprint?
A Blueprint is a saved reusable Subgraph component that can be loaded again later instead of rebuilding the same node group from scratch.
Why should I use Subgraph?
Use Subgraph when your workflow has repeated or complex node groups that make the canvas difficult to read.
Why should I use Blueprints?
Use Blueprints when you want to reuse a working Subgraph in future workflows.
What should I do if my Blueprint does not appear?
Restart ComfyUI and check whether the exported JSON file is in the correct Blueprint-related folder for your setup.
Can I share Blueprints with other people?
Yes, but make sure you also explain any required custom nodes, models, LoRAs, or dependencies needed for the Blueprint to work correctly.