The Ultimate Guide to Kling AI Omni Multi-Shot

Hello creators, welcome back to A2SET’s AI Tutorial.
When creating AI videos, one of the most frustrating problems is character consistency.
You may create a cute character in the first scene, but when the background changes, the AI may also change the character’s face, outfit, body shape, or overall style.
For creators who want to make short stories, product mascots, animal characters, or social media videos, this can be a big problem.
In this tutorial, we will use Kling AI’s Omni workflow to create a simple multi-shot video.
Our example character is a duck wearing a red scarf.
The goal is to keep the duck walking in the center of the frame while the background changes across three different environments: a lush green meadow, rainy mud, and a snowy frozen pond.
We will also use Native Audio so the video can include environment-based sounds such as footsteps, rain, mud, and icy ground.
This workflow does not mean the character will stay perfect every time. AI video can still create small changes in details, especially with complex movement or unclear references. However, using Create Element, @ tagging, and Multi-Shot together can make the result much more controlled than a simple text prompt.

Image caption: Kling AI Omni Multi-Shot can help creators keep one character consistent while directing multiple background changes in a single video workflow.
Step 1: Create Your Subject with Create Element
The first step is to create the main character as an Element.
In this example, our subject is a duck wearing a red scarf.
The purpose of this step is to help Kling understand the duck’s appearance before generating the full video.

Image caption: Start by creating an Element so Kling can recognize the main character before video generation.
On the left menu, click the green Omni button to enter the unified workspace.
Near the bottom of the screen, click the circular Create Element icon with the dotted border.
When the character creation window opens, upload at least three images of the duck.
For better results, use different angles if possible: front view, side view, and back view.
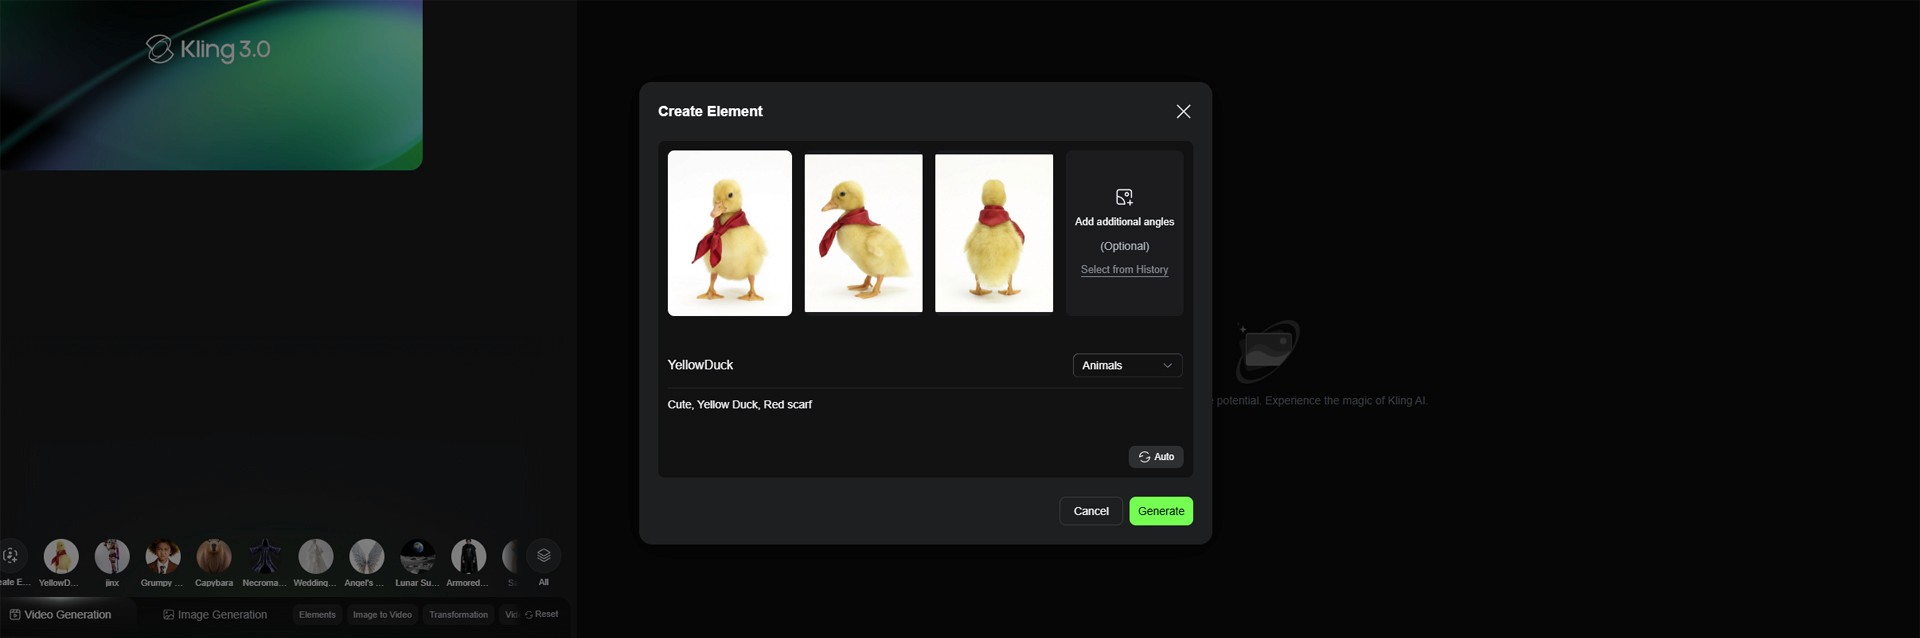
Image caption: Uploading multiple character angles helps the AI understand the subject’s shape, colors, and identity more clearly.
After uploading the images, write a short description of the character.
Prompt: A cute yellow duck wearing a red scarf, small orange beak, soft round body, friendly expression, simple animated character style.
Then select the most suitable category.
For this example, Animal or Character can work depending on how Kling’s current interface classifies the subject.
After checking the information, save the Element.
Step 2: Summon the Character with @ Tagging
Now that the duck Element is created, go back to the main Video Generation prompt box.
This is where we will write the scene prompt.
To use the duck inside the prompt, type @ in the text box and select the duck Element you created.
You can also click the duck thumbnail if the interface shows your saved Elements above the prompt box.
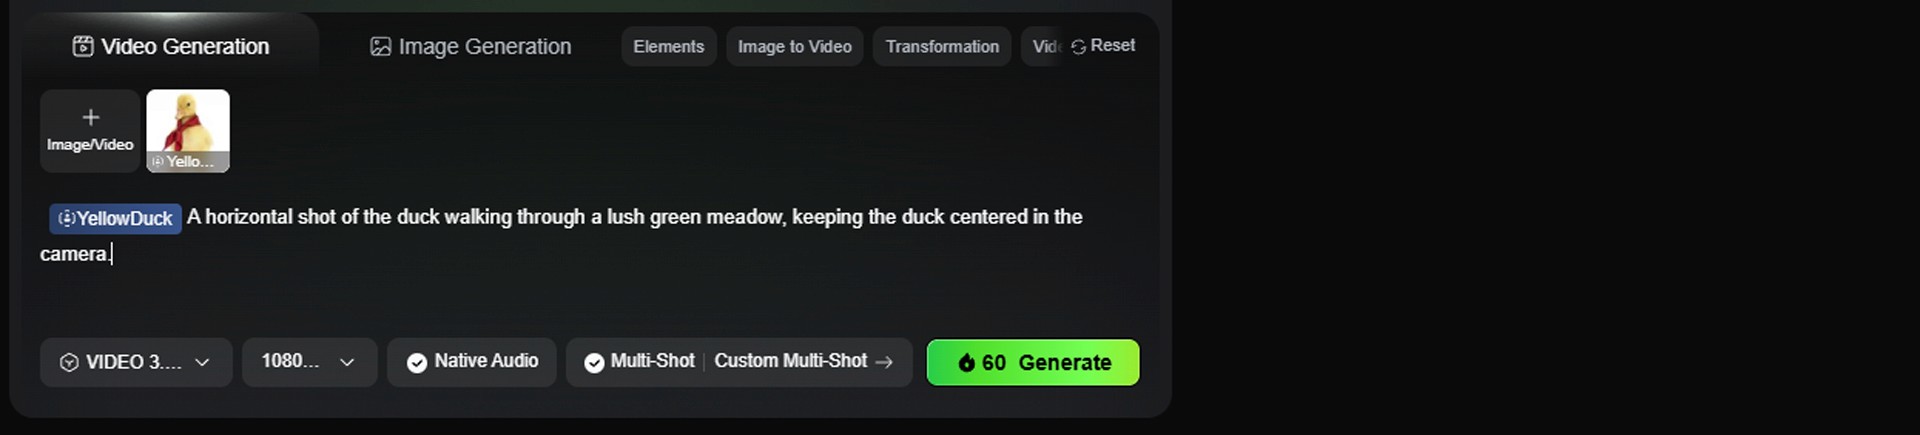
Image caption: Use @ tagging to summon the saved duck Element directly inside the video prompt.
Once the duck is inserted into the prompt, write the first scene direction.
Prompt: A horizontal shot of the duck walking through a lush green meadow, keeping the duck centered in the camera.
This first prompt sets the basic camera direction.
The most important phrase is “keeping the duck centered in the camera.”
This helps the video maintain a consistent subject position while the background changes later.
Step 3: Set Up Multi-Shot Background Transitions
Now we will use the Multi-Shot feature.
The goal is to keep the duck walking while the environment changes every few seconds.
Click the Multi-Shot button near the bottom-right area of the prompt box.
When the timeline opens, create three shots.
Set each shot to 3 seconds.
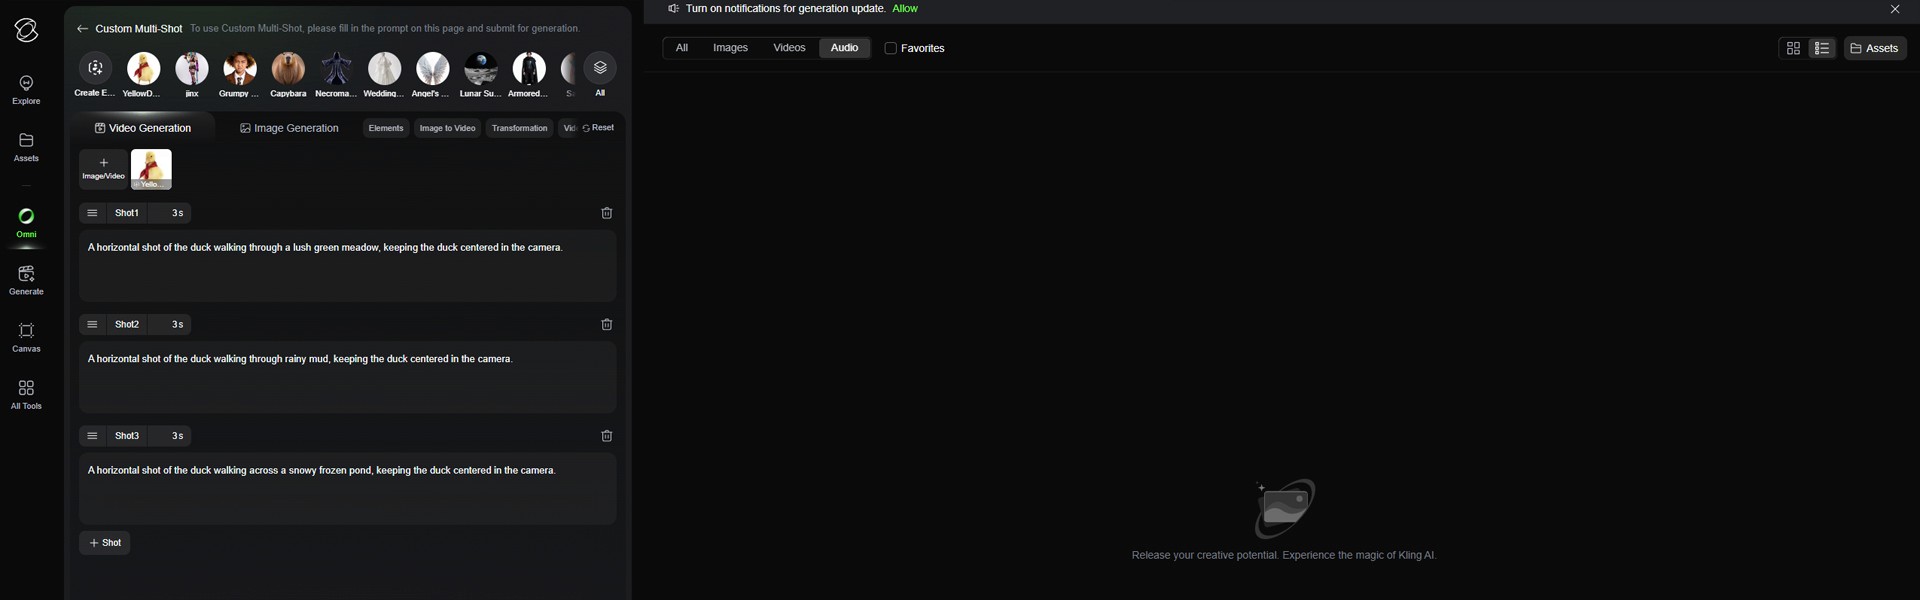
Image caption: Multi-Shot lets you divide the video into separate timed shots while keeping the same main character and direction.
Use the following shot structure.
Shot 1 / 3 seconds
A horizontal shot of the duck walking through a lush green meadow, keeping the duck centered in the camera.
Shot 2 / 3 seconds
A horizontal shot of the duck walking through rainy mud, keeping the duck centered in the camera.
Shot 3 / 3 seconds
A horizontal shot of the duck walking across a snowy frozen pond, keeping the duck centered in the camera.
The important point is that all three shots use the same camera instruction.
Each shot changes the environment, but the camera direction stays consistent.
This helps the transition feel smoother because the duck remains the visual anchor of the video.
Step 4: Match the Total Video Duration
Before generating, check the total video length.
In this example, we created three shots.
3 seconds + 3 seconds + 3 seconds = 9 seconds.
So the total video duration should also be set to 9 seconds.
Click the resolution and length settings button near the bottom of the prompt area.
Set the total length to 9 seconds.
If the total duration does not match the Multi-Shot timeline, the generation may fail or produce an unexpected result.
This is one of the most important setup steps in the workflow.
Step 5: Enable Native Audio
Next, enable Native Audio.
This option lets the model generate sound that matches the video scene, depending on current platform support and model availability.
For this duck example, Native Audio can help create environment-based sounds such as soft footsteps through grass, rain and muddy walking sounds, icy or snowy footsteps, and subtle outdoor ambience.
After enabling Native Audio, review the setup one more time.
Final setup:
Element: Duck wearing a red scarf
Mode: Multi-Shot
Shot 1: Lush green meadow / 3s
Shot 2: Rainy mud / 3s
Shot 3: Snowy frozen pond / 3s
Total Duration: 9s
Native Audio: On
Camera Direction: Horizontal shot, duck centered
When everything is ready, click Generate.
Step 6: Review the Final Video
After the generation is complete, play the video from beginning to end.
Do not only check whether the video looks impressive. Check whether it follows the actual direction.
Image caption: Review the generated video for character consistency, background transitions, camera stability, and audio timing.
Look closely at these points.
Does the duck still look like the original Element?
Does the red scarf stay visible?
Does the duck remain centered in the frame?
Does the background change from meadow to mud to frozen pond?
Does the walking motion feel connected?
Does the audio match each environment?
Are there any strange character changes or camera jumps?
The result may not be perfect every time, but this workflow gives the AI a much clearer structure than one long text prompt.
Common Issues and Simple Fixes
If the duck changes too much between shots, add this line to each shot prompt:
Keep the same duck identity, same yellow feathers, same red scarf, same body shape, and same walking style throughout the entire video.
If the camera moves too much, add this line:
Use a stable horizontal tracking shot. Keep the duck centered in the frame without sudden zooms, spins, or unrelated camera angles.
If the background transition feels too sudden, add this line:
Make the environment transition feel smooth and continuous while the duck keeps walking forward.
If the Native Audio feels too busy, add this line:
Keep the audio subtle and natural. Use gentle environmental sounds that match each scene without overpowering the video.
If the scarf disappears or changes color, add this line:
The red scarf must remain clearly visible and consistent in every shot.
Why This Workflow Is Useful
This workflow is useful because it separates the video direction into smaller, clearer parts.
Create Element defines the character.
@ tagging brings the character into the prompt.
Multi-Shot defines the scene changes.
Duration settings keep the timeline aligned.
Native Audio adds environmental sound.
Instead of asking AI to create everything from one vague prompt, you give it a subject, a shot structure, and clear timing.
This can be useful for short animated stories, mascot videos, children’s content concepts, brand character videos, social media experiments, AI commercial drafts, and environment transition tests.
The same method can be adapted to other characters as well.
For example, you can replace the duck with a robot, cat, puppy, virtual influencer, toy figure, or brand mascot.
You can also replace the environments with a city street, tropical beach, rainy alley, snowy forest, desert road, or futuristic space station.
The key is to keep the character instruction consistent across each shot.
Responsible Use Notes
When creating AI videos, make sure you have the right to use your character images and references.
Do not upload copyrighted characters, private artwork, celebrity likenesses, or another creator’s original character without permission.
If you use this workflow for a brand or client project, keep a simple production record.
Save the character reference images, Element settings, prompts, shot timing, generated video versions, and final usage notes.
This makes the workflow easier to review later and helps avoid confusion when using AI-generated content in public projects.
Conclusion
In this tutorial, we created a simple Kling AI Omni Multi-Shot video using a duck wearing a red scarf.
We created the duck as an Element, summoned it with @ tagging, set up three 3-second shots, changed the environment from meadow to mud to frozen pond, matched the total video duration to 9 seconds, and enabled Native Audio.
This workflow is useful because it gives creators more structure.
It does not guarantee perfect consistency in every generation, but it can reduce randomness and make the final video easier to direct.
Start with a clear Element.
Use the same character instruction across shots.
Keep the camera direction consistent.
Match the total duration correctly.
Enable Native Audio if it fits the project.
Then review the result carefully.
That is how Kling AI Omni Multi-Shot can become a practical workflow for character-based AI video creation.
We will return in the next A2SET tutorial with more practical AI workflows for creators, designers, and small production teams.
Quick FAQ
What is Create Element used for?
Create Element is used to define a subject, character, animal, or object so it can be referenced more consistently during video generation.
Why should I upload multiple images of the character?
Multiple angles can help the AI understand the character’s shape, colors, and visual identity more clearly than a single image.
What does @ tagging do?
@ tagging lets you insert your saved Element directly into the prompt, so the video generation can use that specific subject as a reference.
What is Multi-Shot used for?
Multi-Shot lets you divide a video into timed sections. Each shot can have its own scene direction, background, camera instruction, or action.
Why should the total duration match the shot durations?
If your Multi-Shot timeline adds up to 9 seconds, the total video duration should also be set to 9 seconds. This helps avoid generation errors or mismatched timing.
Does Native Audio always work perfectly?
No. Native Audio can vary depending on model, scene, and platform settings. Always review the final audio before publishing.
Can I use this workflow for commercial content?
Possibly, but check Kling AI’s current commercial usage terms, plan limits, watermark policy, and rights guidance before using the result in paid work.