The Ultimate Guide to Meshy AI’s All-in-One Animation Workflow

Hello creators, welcome back to A2SET’s AI Tutorial.
In this tutorial, we will walk through a full Meshy AI workflow for turning a 2D character illustration into a 3D animated asset.
Our example character is a cute capybara-style mascot inspired by a simple 2D illustration workflow. The goal is to show how a flat character image can become a 3D model that can be textured, optimized, rigged, animated, and exported for further testing in 3D software.
In a traditional 3D workflow, this process can involve many separate steps: modeling, UV work, texture painting, retopology, rigging, animation testing, and export settings.
With Meshy AI, many of these steps can be tested inside one browser-based workflow.
This does not mean the result will be perfect every time. AI-generated 3D models can still need manual cleanup, especially for professional games, close-up animation, or production-ready assets. However, for concept testing, character previews, 3D storyboards, and early animation experiments, this workflow can save a lot of time.
Step 1: Turn a 2D Capybara Image into a 3D Model
First, prepare a front-facing capybara character image.
For animation, it is better to prepare an image where the character’s arms and legs are clearly visible. A T-pose or A-pose style image can make the later rigging process easier.
If your original image is a normal front-facing illustration, you can still test it in Meshy. However, the result may be more stable if the character has a clean silhouette and the limbs are not hidden.
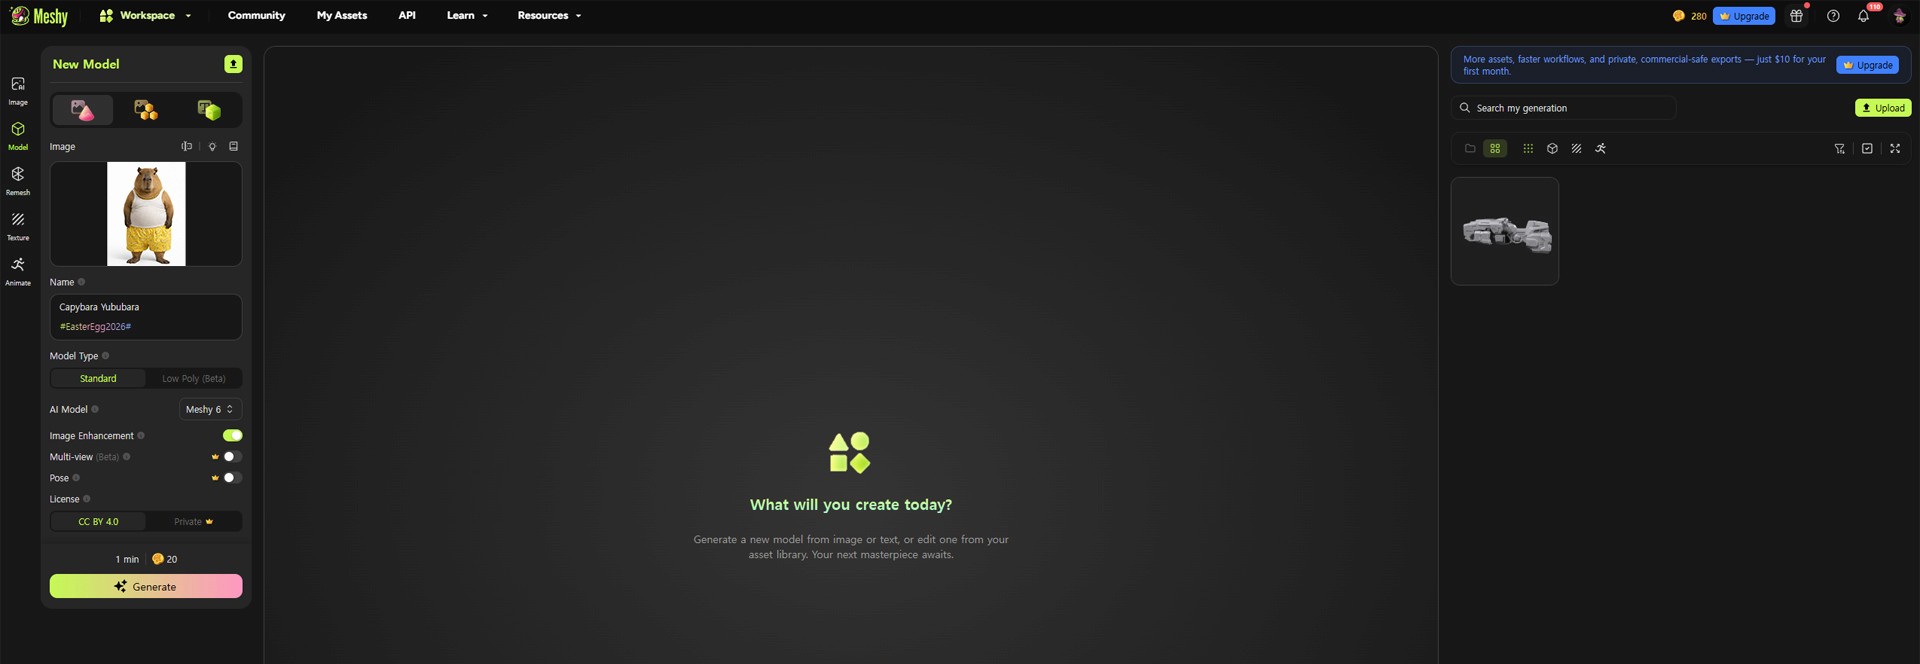
Image caption: A clear front-facing character image gives Meshy AI a better starting point for 3D model generation.
Go to Meshy AI, log in, and open the Image to 3D menu.
Upload your prepared capybara image into the image upload area.
In the settings, choose the latest available AI model in your account. If a pose option is available, choose T-pose or A-pose for a character that will later be rigged and animated.
Then click Generate.
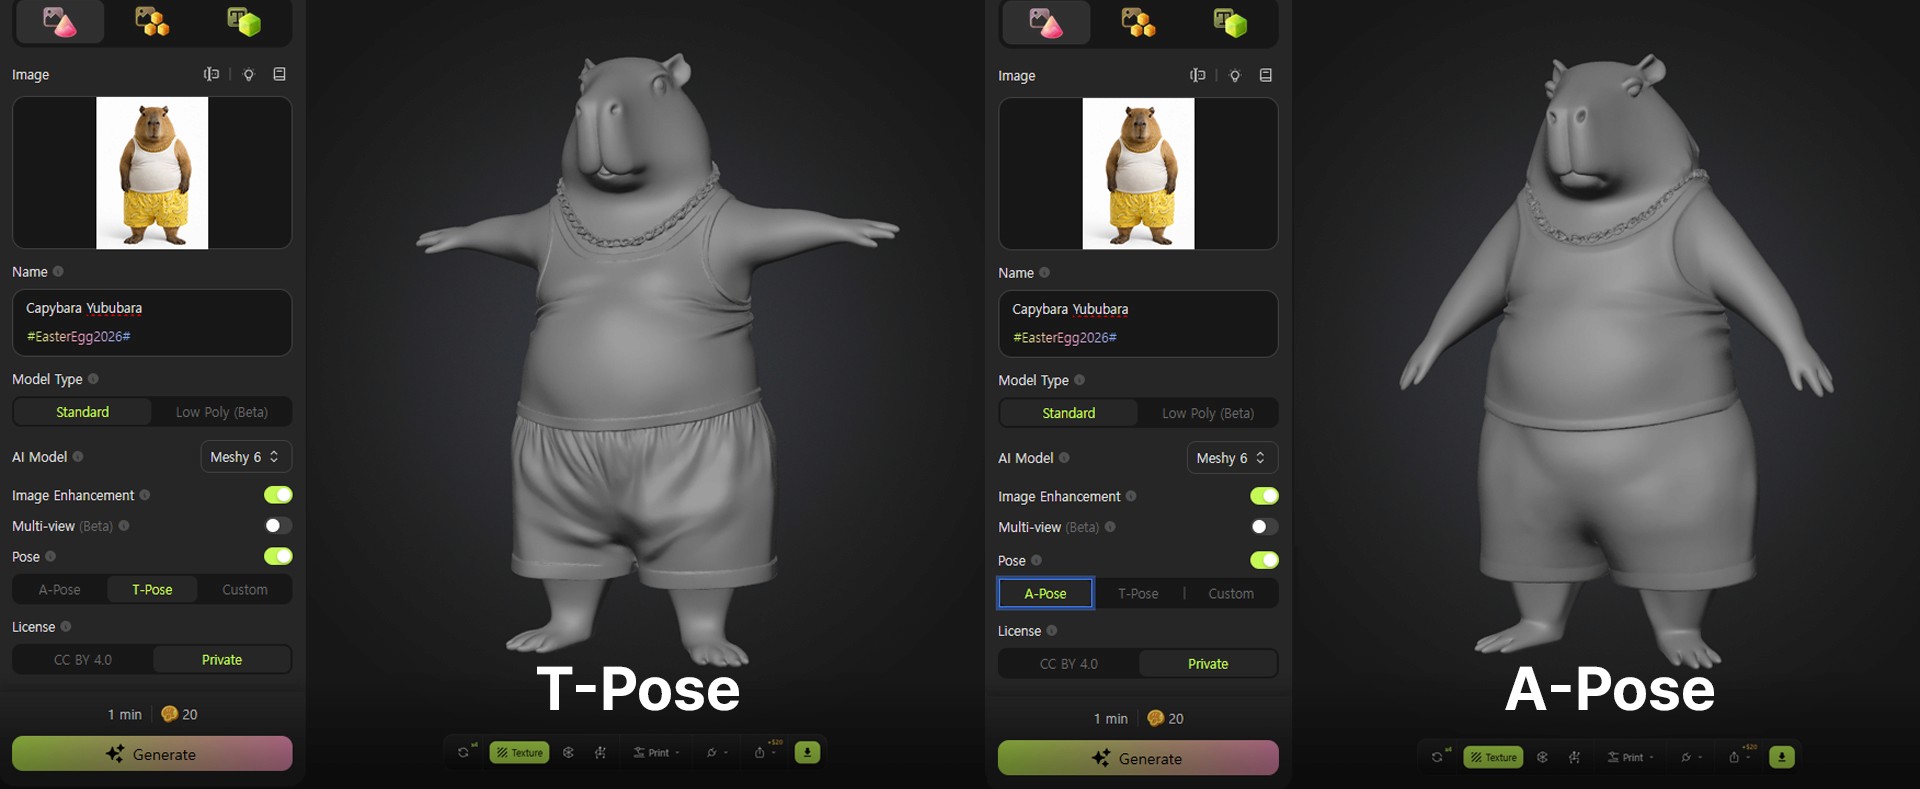
Image caption: Upload the 2D capybara image in Meshy’s Image to 3D workflow and generate the first 3D model.
After the generation is complete, Meshy will show a 3D model based on your image.
At this point, do not judge only by the first preview. Rotate the model and check the front, side, back, arms, legs, and overall shape.
Look for obvious issues such as distorted limbs, missing body parts, uneven proportions, or unwanted extra geometry.
If the result is too unstable, try improving the source image first. A cleaner image usually gives the AI a better chance of understanding the character shape.
Step 2: Add PBR Textures
Once the 3D model is generated, the next step is texturing.
The goal is to make the model look closer to the original illustration by adding color and surface detail.
In Meshy, open the Texture menu from the left toolbar.
Instead of using only a text prompt, use the Image Input option and upload the original capybara image again as a texture reference.
If the option is available, turn on Generate PBR Maps.
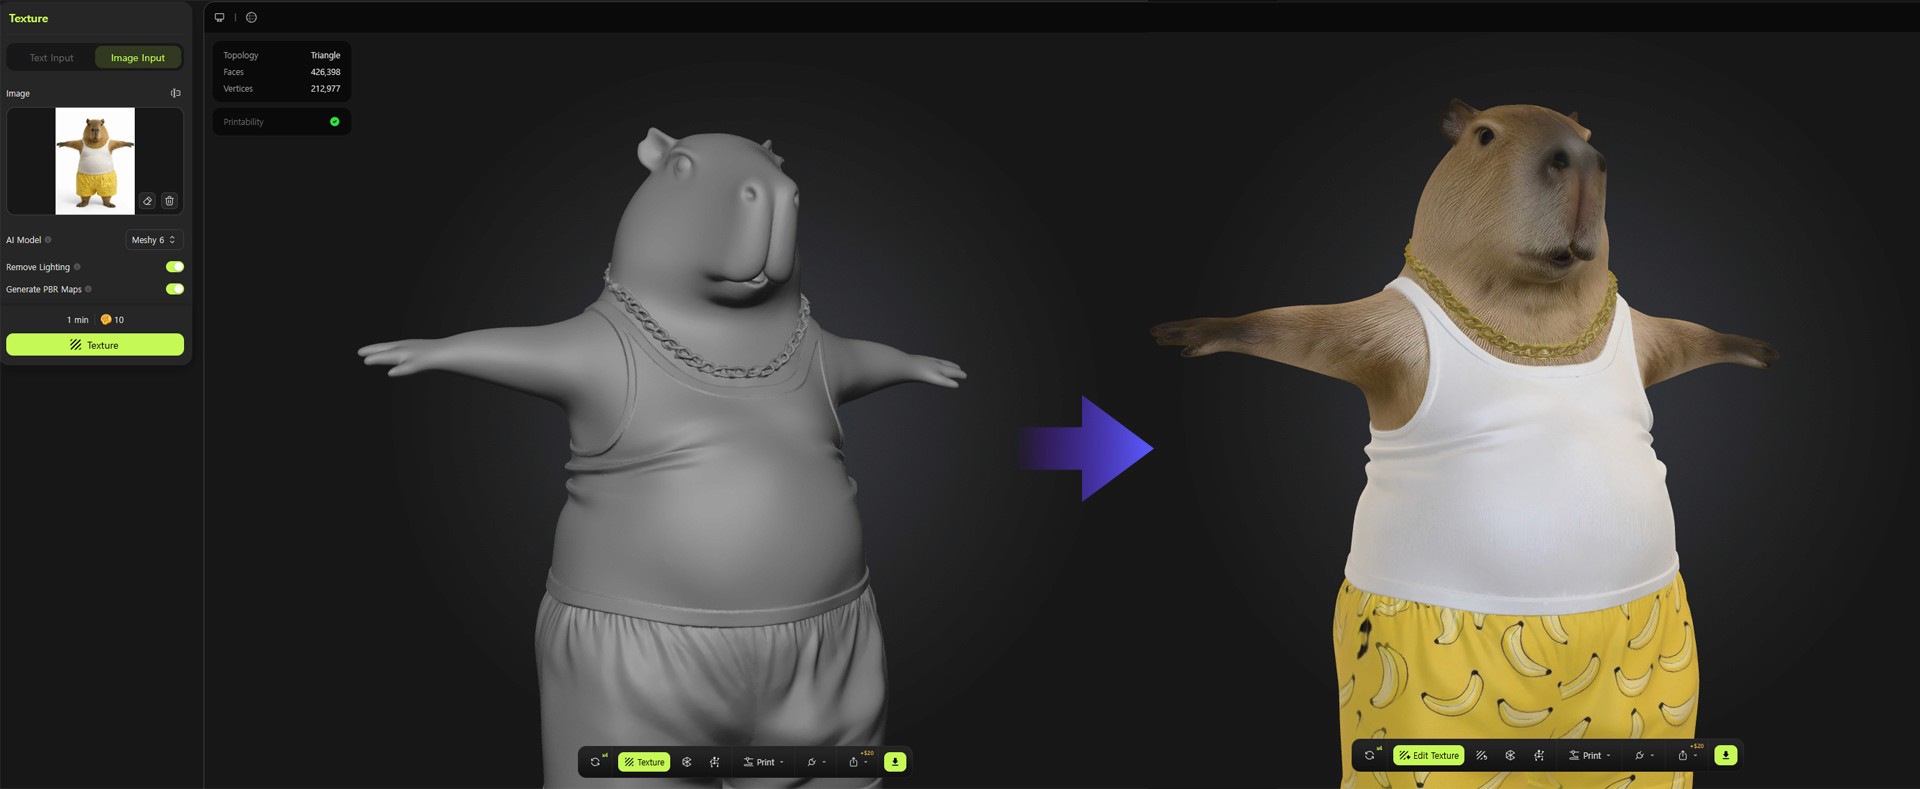
Image caption: Use the original 2D image as a texture reference so the generated 3D model can keep the character’s color and surface details.
PBR stands for Physically Based Rendering. In practical terms, PBR maps help the model react to light more naturally.
Depending on the tool settings, the generated texture may include base color, roughness, metallic information, and normal map details.
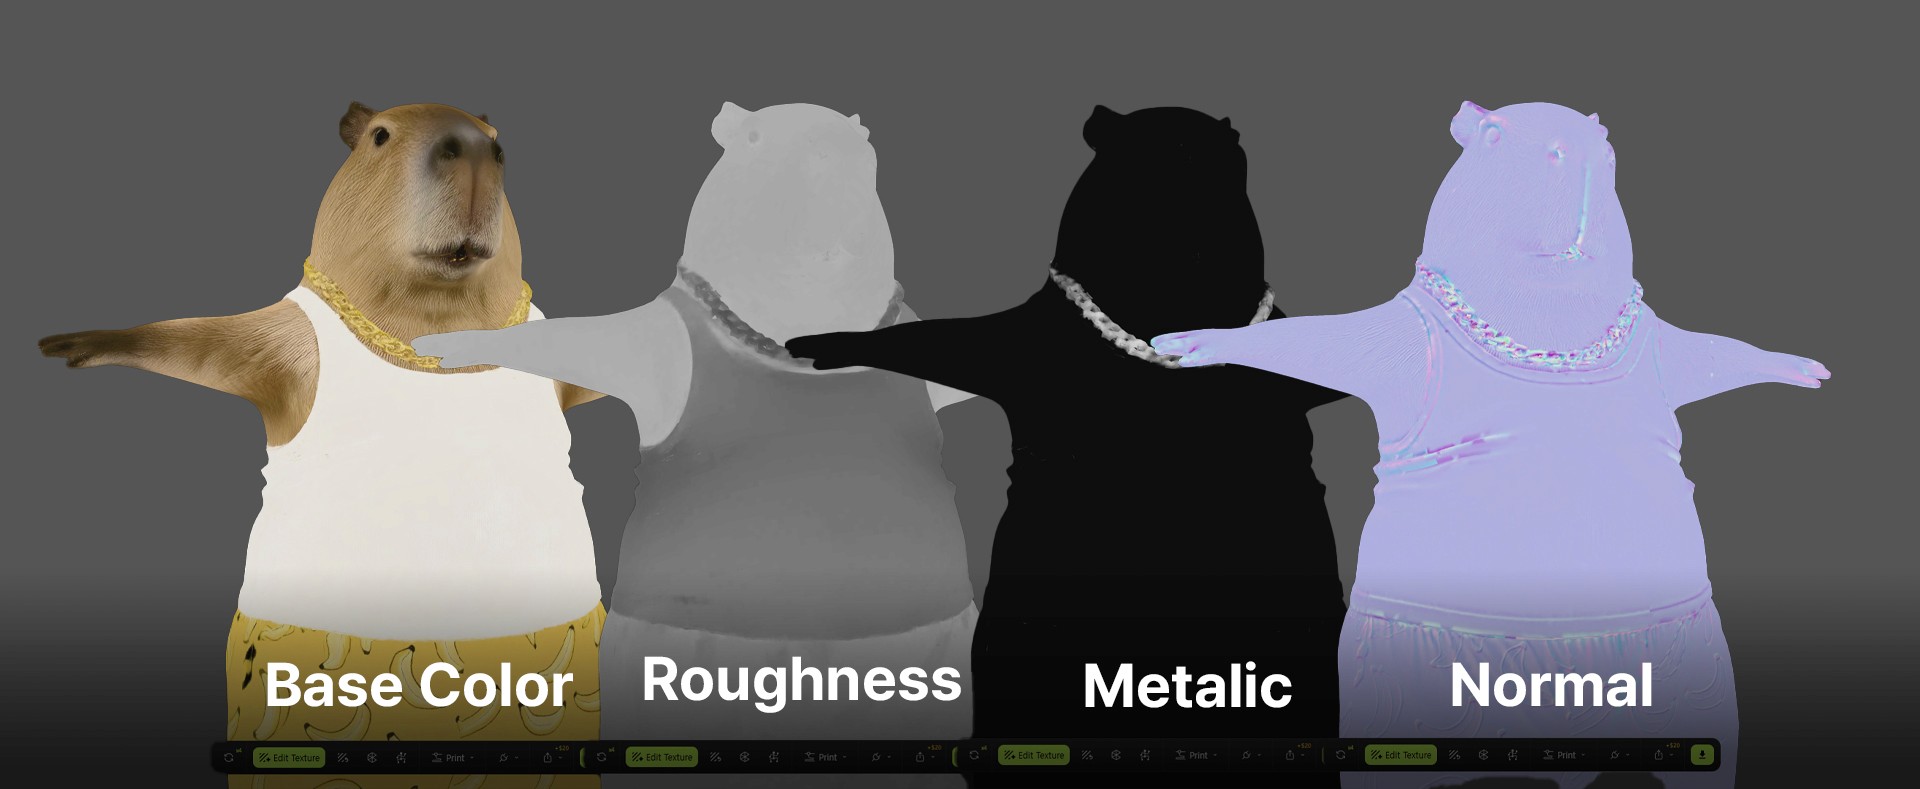
Image caption: Checking PBR textures.
For a simple character like this capybara, the most important part is that the color and main visual identity remain close to the original image.
After texturing, rotate the model again and check whether the colors are applied correctly.
Look especially at the face, body, clothes, arms, legs, and any important design details.
Step 3: Optimize the Mesh with Remesh
A generated 3D model can look good in preview, but it may not be ready for animation yet.
The reason is topology.
Topology is the way the surface of the model is built with polygons. If the model has messy triangles or uneven geometry, the character may bend poorly when animated.
That is why remeshing is an important step.
Open the Remesh menu from the left toolbar.

Image caption: Remesh helps reorganize the 3D model’s surface so it becomes easier to test with rigging and animation.
If you are using a free plan, some polycount and topology options may be limited. If you are using a paid plan, you may have more control over target polycount and topology type.
For animation testing, quad-based topology is usually more useful than random triangle-heavy geometry.
If available, choose a balanced target polycount and use Quad topology.
Then confirm the remesh.
This process can help make the model cleaner for rigging and animation, but it still does not replace professional retopology in every case.
For a serious game or animation project, you may still need manual cleanup in Blender, Maya, ZBrush, or another 3D tool.
For quick concept animation, however, this automatic remesh workflow can be very useful.
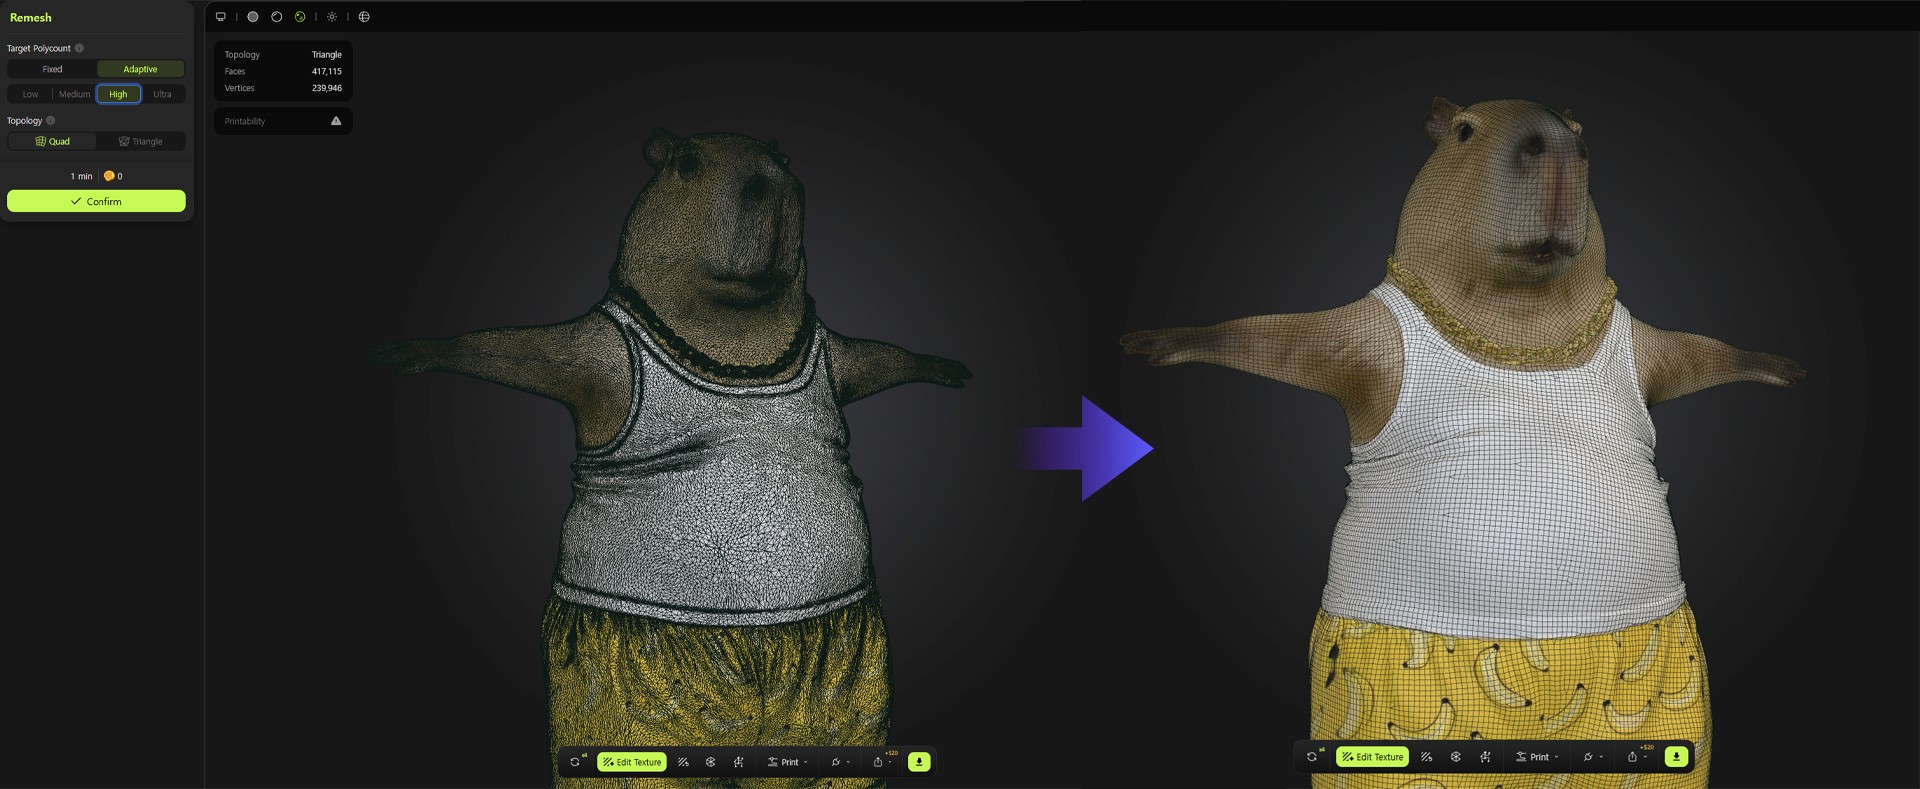
Image caption: A cleaner mesh can make character rigging and animation tests more stable.
Step 4: Add Joints with Rigging
After remeshing, move to the Animate or Rig menu.
Rigging means adding bones or joints to the character so it can move.
For this capybara example, the character stands on two legs and behaves more like a humanoid mascot. In that case, choose the Humanoid character type if the option is available.
If you are working with a four-legged animal character, choose a quadruped option if it matches your model better.
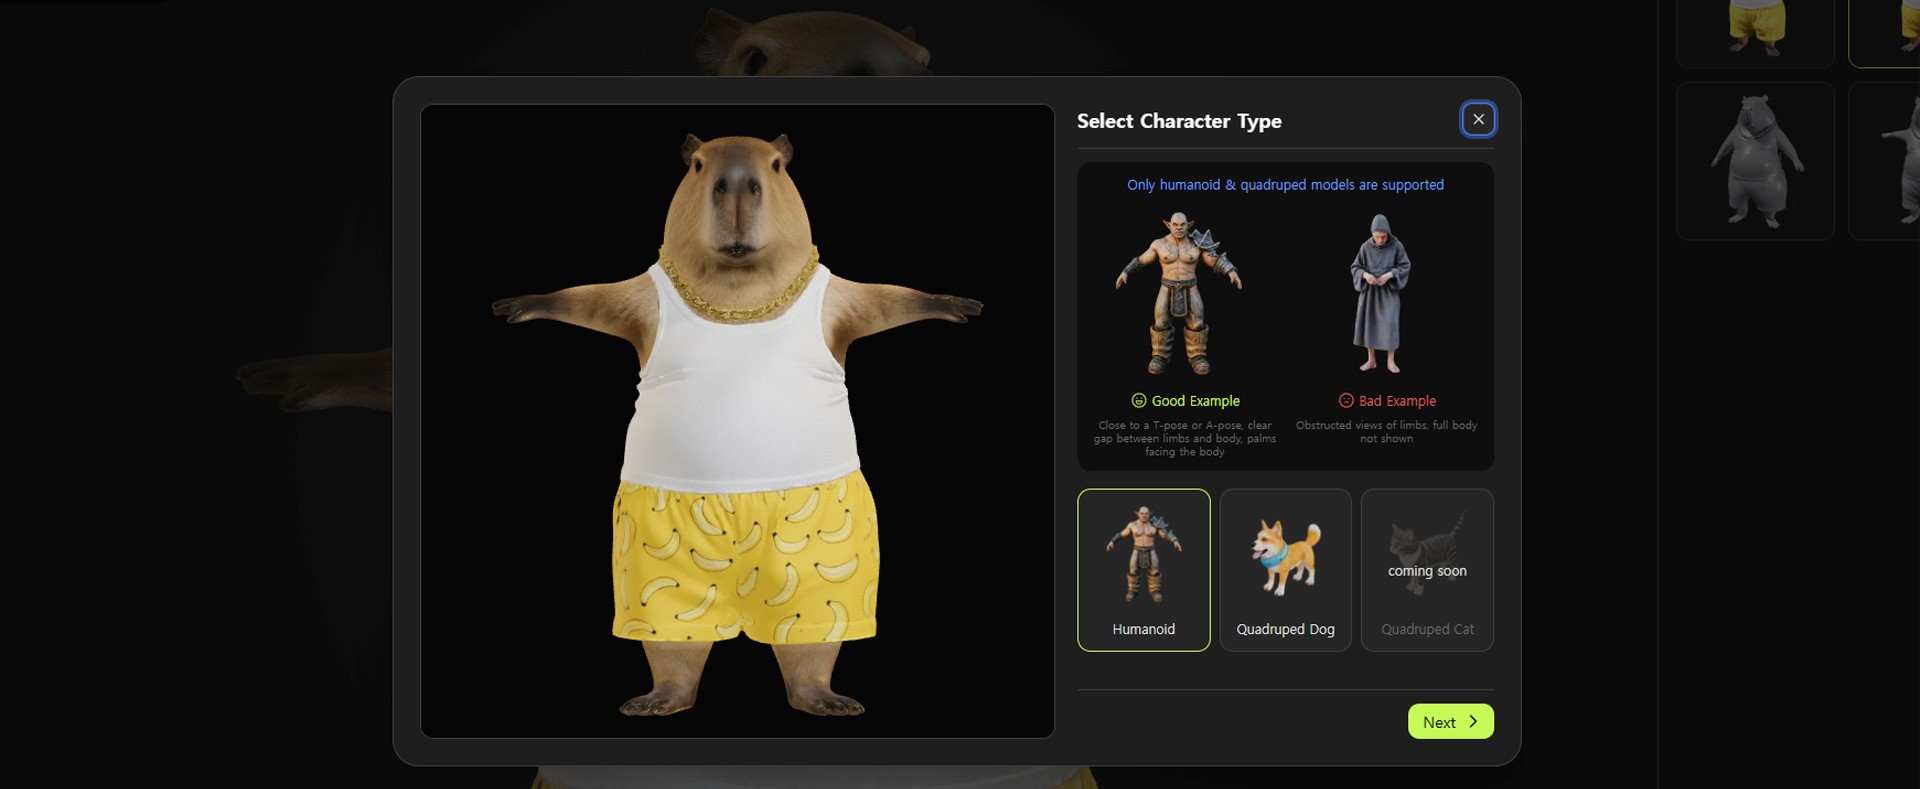
Image caption: Choose the character type that best matches your model before placing rigging markers.
Next, place the guide markers on the correct body parts.
The common marker areas include chin, shoulders, elbows, wrists, pelvis or groin area, knees, and ankles.
If the model is symmetrical, turn on the Symmetry option if available. This can help adjust both sides at the same time.
After placing the markers, click Confirm.
Meshy will generate a rig based on the marker positions.
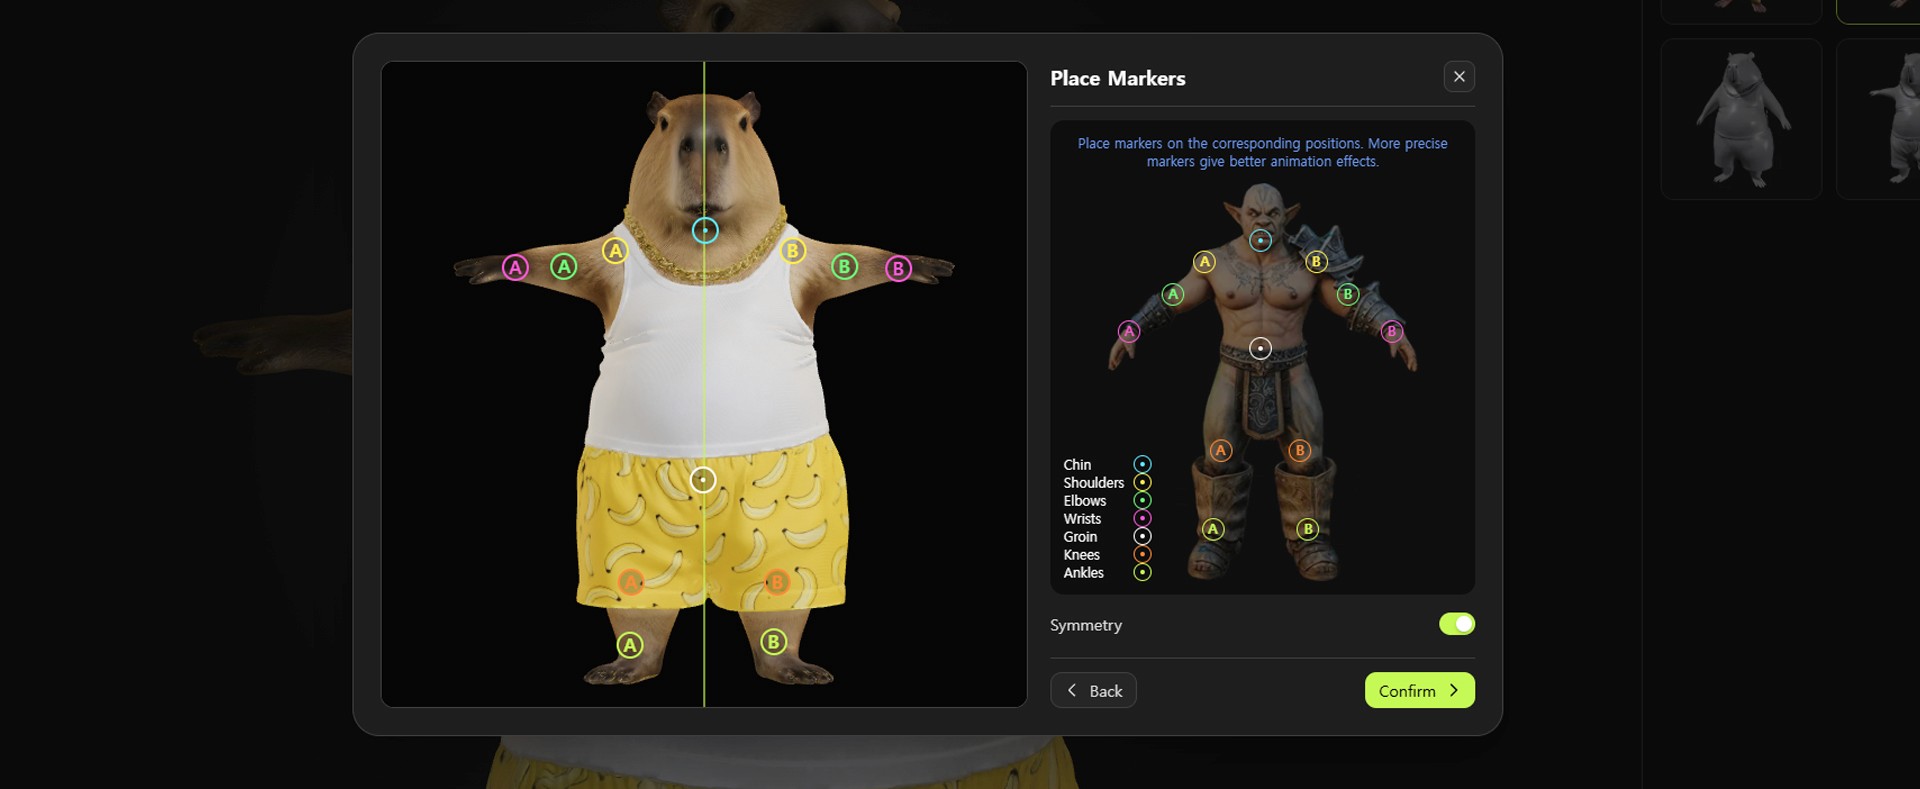
Image caption: Place markers carefully on the character’s joints so the rig can follow the body structure more accurately.
This step is very important.
If the markers are placed incorrectly, the arms, legs, or body may bend in strange ways. Spend a little time checking the marker positions before confirming.
Step 5: Test Animation Presets and Export
Once the rig is applied, test the character with animation presets.
You may see preset motions such as walk, run, dance, idle, or other animation options depending on the current Meshy interface.
Click several presets and watch how the capybara moves.
Image caption: Test animation presets to check whether the character’s joints move naturally.
When reviewing the animation, check these points:
Does the face stay stable?
Do the arms bend naturally?
Do the legs move without breaking?
Does the body stretch too much?
Are there strange deformations around the shoulders, knees, or pelvis?
Does the texture stay connected while the model moves?
If the motion looks acceptable, choose the animation you want to export.
Then click Download or Export.
For animation workflows, Animated FBX is a useful format because it can be imported into tools such as Blender, Unity, and Unreal Engine.
Before using it in a real project, open the file in your 3D software and check the animation again.
Step 6: Test the Animated FBX in Blender
Now open Blender or another 3D tool that supports FBX import.
In Blender, go to File > Import > FBX and select the exported capybara file.
Once the model is imported, press Play on the timeline.
Check whether the animation plays correctly.
Also check whether the texture is still connected, whether the material looks correct under lighting, and whether the model scale feels usable.
If the model appears too large, too small, or rotated incorrectly, you can adjust it inside Blender.
This final test is important because a model that looks good in a browser preview may behave differently inside real 3D software.
Common Issues and Simple Fixes
If the 3D model shape looks wrong, use a cleaner source image with a front-facing view, simple silhouette, and visible limbs.
If the texture does not match the original image, upload the original image again as the texture reference and keep the model design simple.
If the model bends badly during animation, try remeshing again with cleaner topology settings if available.
If the rig markers feel difficult to place, use a more symmetrical character image and make sure the arms and legs are not hidden.
If the exported file looks strange in Blender, check the import scale, material links, texture files, and animation timeline.
Why This Workflow Is Useful
This Meshy workflow is useful because it brings several 3D production steps into one place.
You can start from a 2D image, generate a 3D model, add texture, optimize the mesh, create a rig, test animation, and export the result.
For professional 3D production, this does not remove the need for human artists. Manual modeling, topology cleanup, UV editing, rig refinement, and animation polish are still important when quality requirements are high.
But for fast concept development, character testing, 3D storyboard creation, and early game asset exploration, this workflow can be very practical.
It helps creators quickly check whether a 2D character idea can work as a 3D animated asset.
Responsible Use Notes
When using a character image as input, make sure you have the right to use it.
Do not upload copyrighted characters, brand mascots, private artwork, or another creator’s character design without permission.
If you are using a character inspired by an existing creator or channel, treat it as a learning test only unless you have permission to use it commercially.
For client or brand projects, keep a simple production record.
Save the original image source, generation settings, texture reference, remesh settings, exported file, and final usage notes.
This helps keep your workflow organized and safer if the asset is used later in a public project.
Conclusion
In this tutorial, we turned a 2D capybara-style character illustration into a 3D animated asset using Meshy AI.
The workflow included Image to 3D generation, PBR texturing, remesh, rigging, animation preset testing, Animated FBX export, and Blender import.
The result may not replace a professional 3D production pipeline, but it can be a strong starting point for concept testing and quick animation experiments.
Start with a clean character image.
Generate the 3D model.
Add texture from the original image.
Remesh the model for cleaner topology.
Rig the character carefully.
Test animation presets.
Then export and check the result in Blender.
That is how Meshy AI can help turn a flat character idea into a moving 3D asset much faster than a traditional manual workflow.
We will return in the next A2SET tutorial with more practical AI workflows for creators, designers, and small production teams.
Quick FAQ
Can Meshy AI turn a 2D image into a 3D model?
Yes. Meshy provides Image to 3D features that can generate 3D models from uploaded images. The result quality depends heavily on the input image.
Do I need a T-pose image?
It is not always required, but a T-pose or A-pose style character image can make later rigging and animation testing easier.
What is PBR texturing?
PBR texturing uses material maps such as base color, roughness, metallic, and normal information to help a 3D model react more naturally to light.
Why is remesh important?
Remesh helps reorganize the model surface. Cleaner topology can make rigging and animation tests more stable.
Can I export the result to Blender?
Yes. If you export a supported format such as FBX, you can import the model into Blender and test the animation there.
Is the result ready for a real game?
It depends on the quality requirements. For prototypes and concept tests, it may be useful. For final production, manual cleanup and optimization may still be needed.
Can I use someone else’s character image?
Only if you have permission. Avoid using copyrighted characters, creator-owned mascots, or private artwork without rights.