Turn a Single Photo into a 3D Movie with Alibaba Wan 2.6!


Title
Turn a Single Photo into a 3D Movie! Alibaba Wan 2.6 "Multi-Shot" Cinematic Video Production Guide 🎬
Introduction
Hello, creators! When making videos with AI in the past, have you ever felt frustrated by flat, single-angle shots that refuse to transition? Or perhaps you've turned a portrait into a video, only to see the background bizarrely distorted or the subject moving like a flat paper cutout. We've all been there.
Alibaba Cloud's 'Wan 2.6', which is completely shaking up the AI video ecosystem in the first half of 2026, has arrived to shatter these limitations. Wan 2.6 is not just a simple pixel animation tool. It infers and reconstructs the entire depth of a '3D space' from just a single 2D flat image, and then simulates a freely moving camera within that physical space.
Moreover, without even needing to open a video editing program, a single text prompt allows you to use the "Multi-shot" feature. This automatically edits multiple camera angles (e.g., from a close-up to a wide shot) into a short but impactful 5-second clip (available on the free tier) while flawlessly supporting native audio sync. Today, tailored to the free test environment, I'll walk you through a highly detailed, practical guide on how to turn a single photo into a perfect 5-second short film scene. Let's dive right in!
Step 1: Accessing the Official Wan 2.6 Platform & Basic Settings
First, you need to head to the official workspace capable of running this high-performance model.
Open your web browser, go to wan.video (Wan's official AI creative platform), and create a free account.
On the dashboard, click the 'Image-to-Video' menu to build a 3D space based on a single image.

Image Upload:
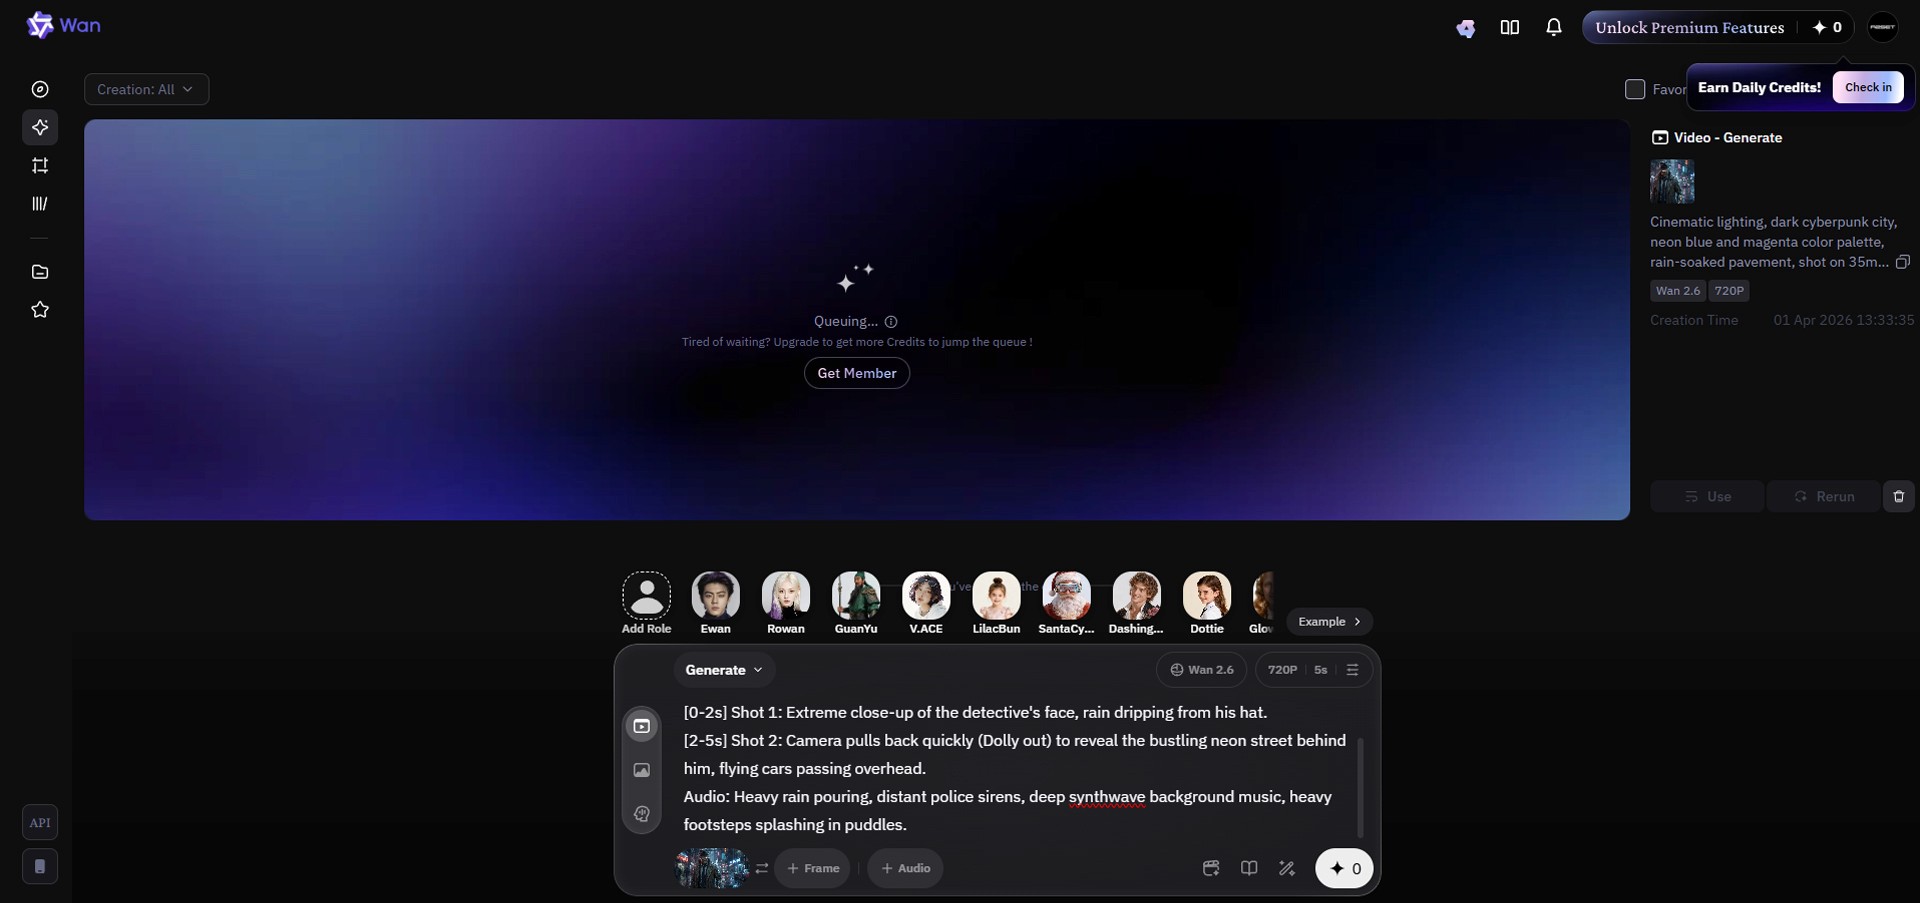
Upload a photo of the character or landscape you want to turn into your movie's protagonist (e.g., a front-facing portrait of a cyberpunk detective standing on a rainy night street). Ensure the image resolution is at least 360px on its shortest side so the model can properly recognize the space.Basic Parameter Settings:
For this free test, select a resolution of 720p. (720p output is supported on the free tier.)
Choose an Aspect Ratio that fits your target platform: 16:9, 9:16, 1:1, 4:3, or 3:4. (16:9 is recommended for YouTube.)
Set the video duration to 5 seconds, which is the free allowance limit.
Step 2: Setting up the 3D Space and Global Look
Now it's time to write the prompt. While you might just type "a walking man" into standard AI models, Wan 2.6 perfectly understands a 'Hierarchical' prompt structure. First, at the very top of the text input box, clearly define the overall tone, lighting, and lens style that will dominate the entire video.
[Global Look Prompt Example]
"Cinematic lighting, dark cyberpunk city, neon blue and magenta color palette, rain-soaked pavement, shot on a 35mm lens, highly realistic 3D space."
Step 3: Writing the Multi-Shot Timeline Prompt (⭐ Today's Core Highlight!)
This feature is the true magic that makes Wan 2.6 a next-generation tool. By instructing the AI with second-by-second timelines using brackets [ ], it automatically splits the camera cuts and stitches the scenes together—no need for external editors like Premiere Pro. Right below the Global Look you just wrote, add the following text tailored to your 5-second length. A pro tip is to clearly specify the camera movements (verbs).
[Timeline Prompt Example]
[0-2s]Shot 1: Extreme close-up of the detective's face, rain dripping from his hat.[2-5s]Shot 2: Camera pulls back quickly (Dolly out) to reveal the bustling neon street behind him, flying cars passing overhead.
Step 4: Adding Native Audio
In the past, you had to render a video and then take it to another sound tool to overlay sound effects. Wan 2.6, however, bakes the video and sound simultaneously in a single generation pass. You don't even need to look for a separate audio button; simply add a description of the sound at the very bottom of your prompt.
[Audio Prompt Example]
"Audio: Heavy rain pouring, distant police sirens, deep synthwave background music, heavy footsteps splashing in puddles."
Step 5: Generate and Review the Results
You're all set! Now, click the 'Generate' button. Wan 2.6 will use your single uploaded 2D image as a visual constraint to construct a 3D space in the background. After a short wait, your 5-second video sequence will be rendered.
Play the result. Watch how naturally the scene cuts transition even within a short 5-second window—the first 2 seconds showing a tight close-up of the face, and the next 3 seconds smoothly pulling the camera back to reveal a wider view of the space. Unlike older AI models where forcefully moving the camera would warp or melt the subject's limbs, Wan 2.6 calculates the actual 3D physical space, maintaining flawless character consistency. You will also notice perfectly synchronized sound effects playing in time with the visual cues of the video (e.g., the rainfall and passing cars).
Conclusion & Final Thoughts
Great job following along! In the past, creating a punchy sequence like this required rendering "2 seconds of a face close-up" and "3 seconds of a full-body shot" separately across different models dozens of times. Then, you had to import them into a video editor, cut the clips, and manually sync the sound effects to match the timing.
However, by leveraging Alibaba Wan 2.6's revolutionary "Timeline Multi-Shot Splitting ([0-2s])" and "Simultaneous Native Audio Generation" capabilities, you can cleanly bypass all that tedious post-production work with just a single text prompt. Go ahead and upload those cinematic directorial ideas you've only ever imagined straight into Wan 2.6 right now. In just 5 seconds, you will experience your monitor transforming into a Hollywood studio!